Model rocket nose cone sizes: shoulder and tube fit
Model rocket nose cone sizes can look simple until the replacement cone stops halfway into the tube. The outside looks right. The label looks right. But the part that actually slides inside, the shoulder, may be wrong for that airframe or may be catching on something you cannot see.
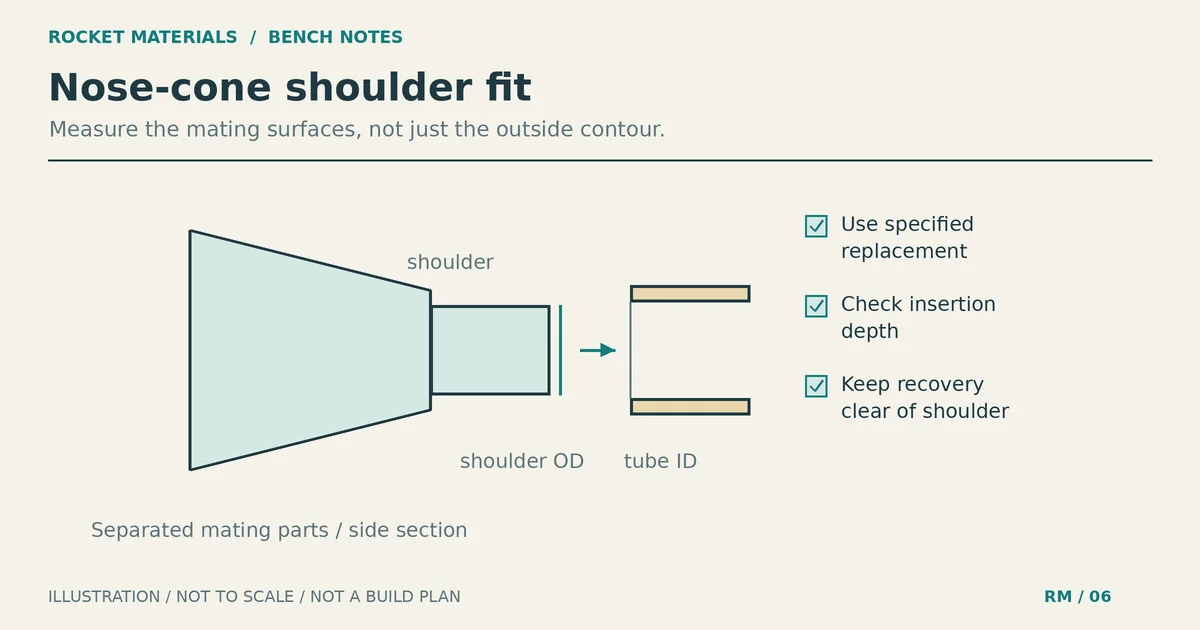
Start with the shoulder’s outside diameter and the body tube’s inside diameter. Then check insertion depth and the recovery gear behind the cone. A diameter match alone does not establish a usable fit, and a usable bench fit does not certify the rocket for flight. For a commercial kit, use the specified replacement part and the current assembly and launch instructions before making adjustments.
Which nose cone dimensions matter?
The shoulder is the section below the visible nose cone that enters the airframe. Its outside diameter, usually shortened to OD, must suit the tube’s inside diameter, or ID. The wider base above the shoulder meets the tube rim. That base affects the outside contour, but it is not the dimension to measure when diagnosing a tight sliding fit.
Apogee’s discussion of proper nose cone fit compares tube ID with shoulder diameter and explains why seams, taper and uneven contact complicate the result. Its dimensions describe the author’s example build, not a verified replacement SKU for your rocket. Do not transfer those numbers to a different cone.
Use the existing body tube size chart to identify the likely tube family. You still need the exact supplier’s specifications and an actual fit check. A nominal size is a starting point for finding parts, not permission to force them together.
| Dimension or feature | What to compare | What it cannot tell you |
|---|---|---|
| Shoulder outside diameter | The airframe inside diameter along the insertion area | Whether a seam or damaged rim will bind |
| Nose cone base diameter | The tube outside diameter at the joint | Whether the shoulder slides correctly |
| Shoulder length | The space available inside the tube | Whether recovery gear can clear the joint |
| Attachment location | The kit’s intended cord routing and packed recovery layout | The attachment’s strength or flight suitability |
Check the part identity before reaching for sandpaper
Find the kit name and part number in the instructions. For a replacement, compare that information with the manufacturer’s listing. Keep tube family, supplier and material together in your notes. Two parts described by the same rounded diameter need not have the same mating dimensions.
If the listing gives only a base diameter or overall length, ask the supplier for the shoulder OD, shoulder length and intended matching tube. Do not assume an unlabeled diameter means shoulder diameter. If the part number is missing, ask before ordering. A cone bought because it looks about right can leave you trying to repair a mismatch that should have been caught before it reached the bench.
Wall thickness is another reason outside appearance can mislead. The opening depends on the tube’s inside dimension, not just its outside width. The tube wall thickness and fit guide explains that distinction for nested parts. Here, the mating part is the nose cone shoulder rather than a motor mount.
Measure the actual shoulder and tube opening
Use calipers if you have them, along with good light and the kit instructions. Keep the rocket unpowered while inspecting it, with no motor or starter installed. First look for damage, dried glue and finish buildup. Measurements are less useful if the jaws are sitting on debris or squeezing a soft paper rim.
- Measure the shoulder across more than one direction. Use light pressure so a hollow plastic part does not flex under the jaws.
- Repeat along the area that enters the tube. A reading at the end may miss a wider area closer to the cone base.
- Measure the tube ID across different directions at the opening. Avoid crushing the rim. If the jaws cannot reach farther inside, record that limitation rather than assuming the whole insertion area has the same diameter.
- Write down the readings, units and locations. Note any seam, raised tape edge, oval opening or damaged surface.
Comparing ID and OD helps distinguish an obvious size mismatch from a local obstruction. It does not produce a universal clearance target. Apogee notes that the surfaces are not perfect cylinders and that their contact is uneven. Calipers also cannot tell you how the completed recovery system will behave during deployment.
If the listing uses inches and your calipers use millimeters, use the body tube metric conversion guide to keep the units consistent. Preserve the supplier’s original specification alongside your measurement; rounding should not become a fit allowance.
Separate a diameter problem from an insertion problem
With the recovery gear moved clear, try the cone gently in the empty opening. This is an inspection, not a strength test. Stop when it binds. Notice whether resistance begins at the rim, builds along the shoulder or appears suddenly near the seated position.
A shoulder that catches immediately may be oversized, or the tube mouth may be distorted. A cone that enters easily but stops at a repeatable depth needs an internal check. Look for an inward glue ridge, a cord mount or other hardware in the insertion path before removing any material.
Measure shoulder length from the seating step to the shoulder end. Check whether the attachment feature extends farther into the airframe. Compare that occupied space with the kit’s intended layout. A longer shoulder can interfere with recovery packing even when its diameter suits the opening.
Do not shorten a shoulder or relocate an attachment simply to make a replacement seat. Those changes affect more than the visible joint. If the correct part will not seat in the intended assembly, ask the manufacturer to review the obstruction or replace the damaged component.
When the nose cone is too tight
Look for the cause before changing the part. Paint overspray, an obvious molding ridge or a lifted tape edge calls for a different response than a shoulder that is wrong for the tube. A crushed or delaminated airframe mouth needs assessment, not repeated sanding until the cone fits.
Apogee’s nose cone fit video describes sanding a tight shoulder and adding tape to a loose one. Apply those ideas only where the kit or manufacturer permits adjustment. For an approved shoulder adjustment, work gradually on the identified high area and check the fit between passes. Follow material-specific dust precautions.
Avoid digging into the paper tube’s inside wall to enlarge the opening. Do not grind a thin hollow shoulder or sand near an attachment until its structure is compromised. A cone that needs forceful twisting to remove still needs attention, even if twisting gets it out on the bench. The recovery system does not have your hands to help it.
When the nose cone is too loose
Confirm the part identity again. A large mismatch, a worn shoulder or a damaged tube is a reason to stop and seek the right replacement. Tape should not hide the fact that the parts do not belong together.
For a small adjustment that the manufacturer allows, masking tape on the shoulder can change the fit, as Apogee demonstrates. Make a modest change and recheck full insertion and removal. Keep the tape smooth and inside the intended contact area. A folded edge or overlapping lump can introduce a new bind even while another part of the shoulder remains loose.
There is no universal number of tape wraps. Nor should you follow a rule that says the cone is safe because the rocket can hang from it, because it passes a shake test, or because it resists a particular pull. Those observations do not account for the complete rocket, deployment system and flight conditions.
Newsletter 675 discusses breakout force, the force needed to start axial movement. That can describe a measured assembly, but this guide does not adopt its diameter-scaled targets as flight acceptance limits. Use design-specific manufacturer guidance rather than making the shoulder progressively tighter to reach a generic number.
Recheck with the recovery gear in place
An empty-tube fit can hide a packing problem. After the approved assembly steps, pack the recovery gear according to the kit instructions and check that the cone seats without pushing against an overfilled compartment. Keep cord and shroud lines out of the shoulder-to-tube joint.
If the cone fitted before packing but now stops short, inspect the packing and attachment layout first. Sanding will not fix a cord trapped under the shoulder. The shock cord selection and inspection guide covers the separate checks for cord condition and anchors.
Revisit the joint after finishing and again during the manufacturer’s preflight procedure. Apogee identifies humidity, temperature and paint layers as reasons fit can change. Check for peeling tape and new damage too. A fit recorded earlier in the build is not a permanent property of the rocket.
Before you call the fit resolved
- The cone is the kit-specified part or a manufacturer-approved replacement.
- You checked shoulder OD against tube ID rather than comparing outside diameters alone.
- The shoulder seats to the intended position without forced insertion or an unexplained internal stop.
- The packed recovery gear and cord do not obstruct the joint.
- You completed the kit’s current preflight checks, including the required retention and deployment checks.
If any of those checks fails, pause launch preparation. Bring the part numbers, measurements and photos of the joint to the manufacturer or an experienced club mentor. The useful outcome is a correctly identified, unobstructed assembly that meets its own instructions, not a nose cone that merely feels snug.