Model rocket decals: apply waterslides without wrinkles
A decal that folds over itself is hard to straighten without tearing. The easier fix happens before it leaves the paper: keep the film supported, position the backing beside the rocket, and slide only a small edge into place. Model rocket decals need different handling depending on whether they are waterslides or peel-and-stick markings.
Start with the instructions supplied with your sheet or kit. They determine how to release the decal and whether any setting solution or protective clear coat is appropriate. The steps below explain the transfer method, where wrinkles come from, and when to stop rather than risk the paint underneath.
Waterslide vs peel-and-stick model rocket decals
Estes lists both types in its model rocket decals collection. Read the package instead of guessing from the artwork. A glossy printed sheet alone does not tell you how the marking releases.
| Check | Waterslide | Peel-and-stick |
|---|---|---|
| How it releases | Water allows the printed film to slide off its backing. | Peel the marking from its release liner. |
| Positioning | The wet film allows some adjustment before it settles. | Plan alignment before pressing the adhesive down. |
| Main handling risk | Unsupported film folds, stretches or tears. | A crooked first contact or premature pressing traps a poor placement. |
| Water | Use the maker’s soak procedure. | Do not soak or use a wet installation method unless the maker specifies one. |
For self-adhesive markings, the Estes technical manual’s final-touches section warns that placement needs care because the decal cannot be moved once stuck down. Treat the first firm contact as a commitment, not a trial fit.
Check the surface before opening the water dish
Apply markings to the finished surface specified by the kit and decal maker. Paint that feels dry may not yet be ready for handling, water or another coating. Follow the finish manufacturer’s handling and cure instructions; there is no overnight rule that covers every paint.
Check the decal area in light from the side. Dust, rough paint and raised grain can leave the film bridging small gaps instead of sitting against the finish. A pale or silvery haze under clear film is often called silvering. Apogee’s waterslide tutorial discusses gloss preparation to reduce it. That is a finish-planning decision, not permission to spray any clear product over any paint.
If the airframe still needs preparation, settle that first. The cardboard vs fiberglass body tube comparison covers the underlying material choice. Do not use the decal water bath as a way to wet an unfinished paper tube.
A marking on a fin also needs a finished surface rather than exposed wood texture. If you are still choosing stock, the balsa vs basswood fin guide belongs earlier in the build. Decals cannot hide a rough surface reliably.
Gather a small decal setup
- The kit placement drawing and the decal sheet instructions.
- Scissors, a clean shallow water dish and the water temperature specified by the maker.
- A soft clean brush for small positioning adjustments.
- A clean soft cloth or paper towel for blotting.
- A stable support that keeps the rocket from rolling without pressing on fresh markings.
Keep unused decals dry and away from the dish. Work on one marking at a time, especially when learning the transfer. Set the rocket where you can reach the intended area without turning it over onto a wet decal.
Decide the orientation while everything is dry. Check lettering direction, its relationship to the fins, and where a wrap’s seam should land. A dry paper strip can help you rehearse a wrap without risking the printed sheet. Do not tape across a freshly applied decal to make an alignment guide.
How to apply waterslide decals without pulling the film
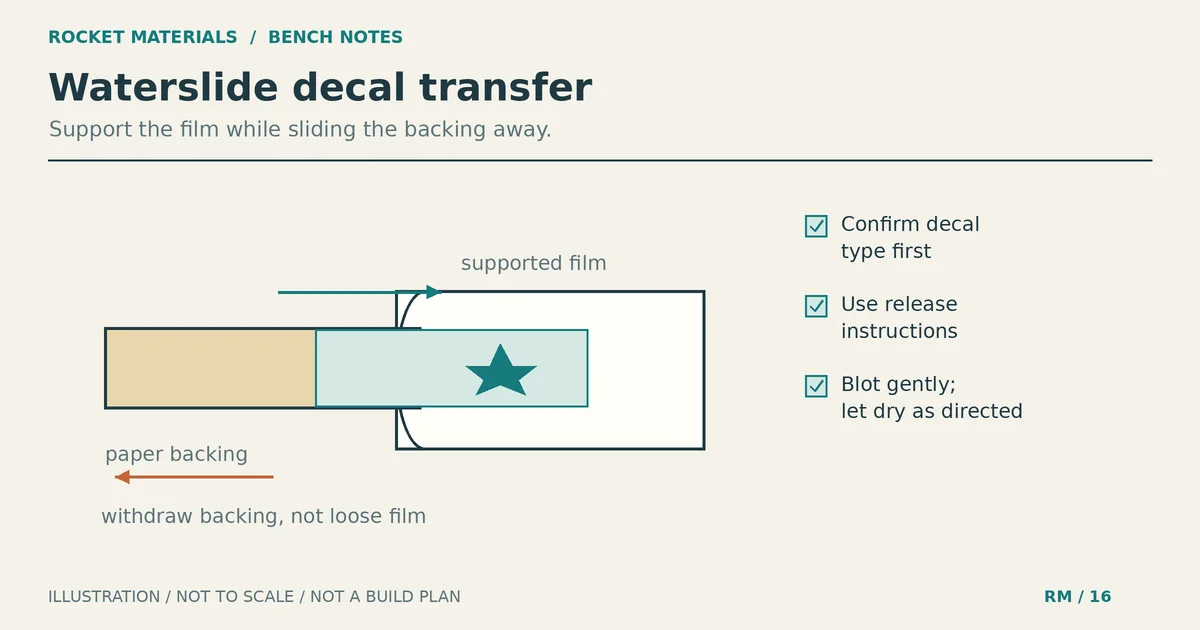
The Estes manual describes a backing-supported transfer: cut out the marking, release it in water, expose one edge, hold that edge on the model and withdraw the backing. Estes’ current Water Slide Decal Set product summary gives the same basic cut, soak and slide sequence. The package instructions should supply the details for your sheet.
-
Cut out one decal while it is dry. Follow any border or cutting guidance supplied with the sheet. Leave enough backing to handle without touching the artwork; do not cut through the printed marking just to remove every trace of clear film.
-
Soak or wet it as directed. Test for release with a gentle movement on the backing, not a tug at the edge. If the film resists, stop and continue the maker’s release procedure. Check release rather than relying on the clock alone.
-
Bring the backing beside the intended position. Where the maker permits it, a little clean water on the finished surface helps positioning. Keep water out of the open body tube and off exposed paper edges.
-
Slide a small edge of the film off the backing onto the rocket. Hold that edge gently in place while drawing the paper out from underneath. The film should move from paper to painted surface without hanging loose between them.
-
Adjust the position while the film still moves freely. Use the damp soft brush for small nudges rather than dragging a dry fingertip over it. If the decal grabs, do not stretch it to reach the alignment mark.
-
Smooth gently and blot excess water. Estes specifies smoothing with a damp finger and blotting with a rag or paper towel. Use light contact; pressing harder can shift the film. Blot rather than scrub, and check that the lettering has not moved.
-
Leave the marking undisturbed for the drying period specified by its maker. Avoid repeated corrections as it settles. Finish the next area only if you can reach it without touching the wet decal.
The manual gives a soak example, but different sheets can release differently. Apogee’s demonstration uses another timing example. Neither is a universal soak time. The useful check is whether your decal slides gently on its backing after the specified preparation.
Long stripes and wraps need more support
A small logo can sit on its backing beside the tube. A long stripe has more film to control. Keep the untransferred portion supported and release it gradually instead of pulling the whole strip free and carrying it through the air.
For a wrap, rehearse the route around the tube before soaking. Apogee’s tutorial checks wrap fit before transfer. Use your kit drawing for the intended seam or overlap; a demonstration’s overlap allowance is not a dimension for every rocket.
A tube band should stay square to the tube as it goes around. Check the first edge before feeding more film into place, then inspect the meeting ends before blotting. Trying to correct the entire wrap after half of it has grabbed can stretch the pattern.
Compound curves, fillets and raised details are harder than a plain cylinder. Do not force a flat marking around a sharp change of shape. If you are decorating a printed nose cone or fairing, the 3D-printed rocket parts guide covers the part checks separately. Check the printed part for flight suitability before spending time on its markings.
Troubleshoot while the decal is still workable
| Problem | Check first | Next move |
|---|---|---|
| Film will not slide | Release preparation and sheet instructions. | Continue the approved wetting process. Do not peel it like a sticker. |
| Film folds or bunches | Unsupported film or too much transferred at once. | If still freely movable, gently unfold with the damp brush. Stop if it resists. |
| Raised pocket under wet film | Trapped water or air, rather than a fold. | Gently guide the pocket toward a nearby edge and blot. Do not scrub or puncture by default. |
| Silvery clear border after drying | Rough finish or air beneath the carrier film. | Do not assume clear coat will fix it. Ask the decal maker about an approved repair. |
| Edge lifts after drying | Surface condition and approved application method. | Consult the maker before adding adhesive. Avoid superglue or solvent experiments. |
| Paint marks or softens | Finish readiness or chemical incompatibility. | Stop applying decals and chemicals. Resolve the finish problem before continuing. |
A crease that has dried into the film may need a replacement decal. Do not turn a cosmetic flaw into scraped paint by chasing it with a blade. Apogee demonstrates aligning torn pieces while wet, but that is a salvage attempt, not a promise that every tear becomes invisible.
Setting solutions and clear coats are optional decisions
A decal softener is not automatically compatible with your film, printed ink or paint. Products called setting solutions and softeners may have different purposes. Use one only when its instructions and the decal maker support the application, then test the exact combination on a spare marking over the same finish.
Do not substitute vinegar, alcohol or an improvised glue mixture based on a generic hobby tip. Apogee’s demonstration includes a glue additive, but the basic Estes transfer procedure does not require it. It is not part of the default method here.
The Estes manual recommends clear acrylic protection after decals dry. Apogee explicitly advises testing a clear finish before using it on the model. Follow the exact paint, decal and clear-coat instructions for compatibility, drying and recoat windows. Neither a universal waiting time nor the word “acrylic” proves that a coating is safe for the layers underneath.
Before calling the rocket finished, check that no marking bridges a nose-cone separation joint or blocks a launch guide. Keep the nose-cone shoulder and recovery attachments free of decorative film. The shock cord mounting and inspection guide covers those functional checks. Start with one small marking, confirm that it transfers cleanly, and use the same supported-film method for the larger pieces.