How to attach a parachute to a model rocket securely
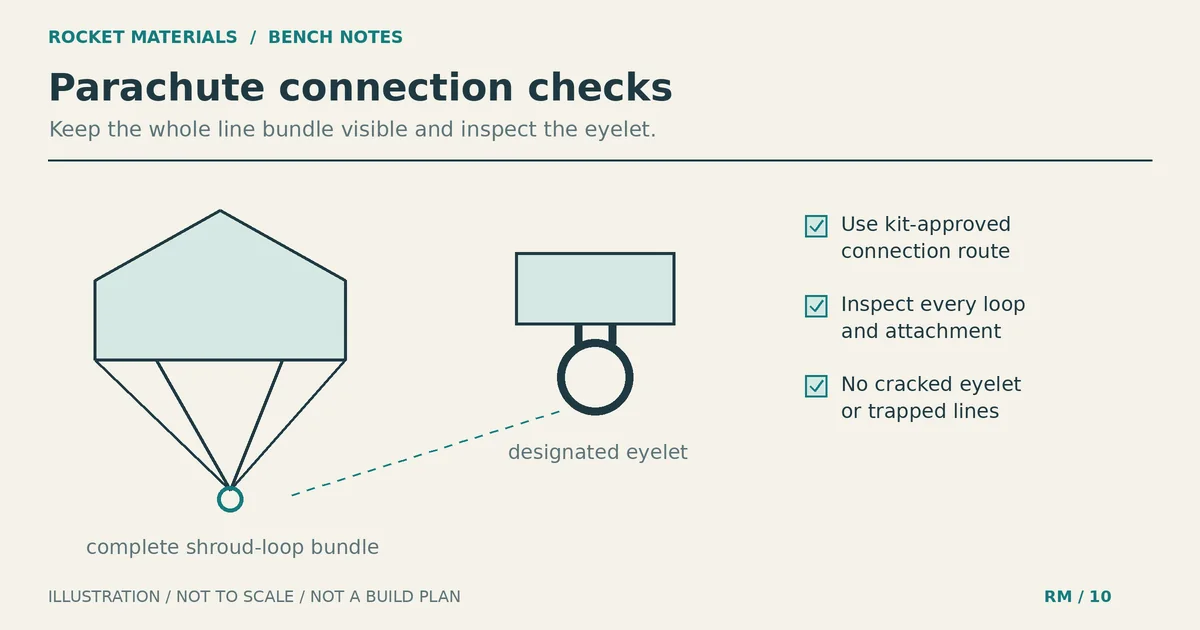
Your kit instructions show how to attach a parachute to a model rocket with its supplied recovery system. For an Estes-style parachute with continuous shroud-line loops, the manufacturer’s basic method is to feed the gathered loops through the nose-cone or adapter eyelet, pass the whole canopy through those loops, then draw the lines snug. An approved snap swivel can provide a removable connection instead. Neither route fixes damaged lines or a cracked eyelet.
The fiddly part is keeping every line in the bundle while you make the connection. A chute can look attached even when one loop has escaped or a line runs across the canopy. Lay the parts out where you can see them before tightening anything.
Choose the attachment route your kit shows
The Estes Model Rocketry Technical Manual, section 9, describes the shroud-loop connection to a nose-cone or adapter eyelet. Its following “Snap Swivel Assembly” section describes a swivel with a closed eye at one end and a wire snap at the other. The swivel helps reduce line tangling when the parachute rotates, and the snap lets you remove the chute.
Those are two attachment arrangements, not permission to put any parachute on any rocket. Use the kit’s supplied system or a replacement the manufacturer confirms is appropriate. The manual is general guidance; current instructions for the exact kit and parachute take priority.
Some fabric parachutes have a separate riser or a sewn attachment loop rather than the continuous loops described here. Follow that canopy’s instructions. Do not cut a riser off to copy a plastic-chute connection, or gather loose line ends into a knot invented at the bench. Our parachute construction and material guide explains why the actual canopy matters more than its fabric label.
Set up before threading the eyelet
Work with the rocket unpowered, with no motor or starter installed. Put the canopy, nose cone and instructions on a clean surface. You need room to spread the chute; you should not need a drill or a new anchor for this attachment job.
- Check the canopy and each line attachment for tears, loose reinforcement or damaged stitching.
- Trace every shroud line between its canopy attachments. Separate tangles without pulling hard on a corner.
- Check the existing eyelet for cracks, distortion or rough damage where the lines will bear.
- If the design uses a swivel, have the specified or manufacturer-approved component available before changing the connection.
A loose screw eye or broken molded eyelet is a separate repair problem. Stop and follow the nose-cone or kit maker’s instructions; do not drill an extra hole in a thin body tube to create a substitute attachment. For cord condition and mount questions, use the shock-cord selection and inspection guide. This procedure assumes the cord and its designed attachments are already installed correctly.
Attach the shroud-line bundle to an existing eyelet
This sequence expands the Estes manual’s loop-through-eyelet method into bench checks. Use it only with the line arrangement and attachment point your kit specifies. You are passing a folded bundle of intact lines through the eyelet, not untying the lines from the canopy.
1. Gather every loop together
Bring the canopy’s attachment corners together without twisting the lines. Follow the lines away from the canopy to the middle of each continuous loop, then gather those middles into one bundle. All the intended loops must participate; do not pick up only the most visible one.
Apogee’s I.T.S. parachute-attachment demonstration, around 0:20-1:29, shows gathering the corners, finding the loop and passing the chute through it. That rocket uses its own nose-cone connection, so use the demonstration for line handling, not as instructions to copy its anchor onto another kit.
2. Feed the gathered loops through the eyelet
Push the folded end of the complete bundle through the designated nose-cone or adapter eyelet. Leave enough loop on the far side to pass the canopy through. Hold that opening so the loops do not slip back while you move the chute.
If the bundle will not pass without force, stop. Recheck the instructions and part compatibility. Do not enlarge a molded eyelet, shave away its surrounding plastic or substitute a thinner line just to make it fit.
3. Pass the whole canopy through the opening
Bring the canopy through all the gathered loops. Keep any reinforcement patches and line attachments from catching on the eyelet. The canopy must pass through the complete opening, not through one loop while the others remain outside it.
Before drawing it snug, check for a trapped canopy corner or a shroud line wrapped around the nose cone. This is the easiest time to undo a mistake. Once the connection tightens, a missed loop can be harder to spot.
4. Seat the connection and trace the lines again
Draw the bundle toward the eyelet until the loop attachment sits snugly against it, as the Estes manual directs. Support the assembly while doing this rather than jerking on the canopy or hanging the rocket from one shroud line.
Spread the canopy again. Trace each line from its canopy attachment to the gathered connection, checking that every loop is captured and none runs over the canopy. A gentle handling check may reveal a missed loop or a slipping connection. It does not measure the attachment’s strength under deployment loads.
Use a snap swivel only when the arrangement is approved
A snap swivel gives you another moving part and a closure to check. It makes chute removal convenient, but it cannot guarantee that the parachute opens without tangles.
For an approved snap-swivel arrangement that specifies the same loop attachment, use the swivel’s closed eye in place of the nose-cone eyelet: feed the complete shroud-loop bundle through that eye, pass the canopy through the loops and draw the connection snug. Then connect the snap to the kit’s designated recovery attachment and close it according to the component instructions. Check that no thread sits inside the closure.
Keep the lines on the closed eye for this arrangement, not loose around the swivel body or caught under the snap wire. Check that the swivel can move and that the closure is fully engaged. If the maker specifies a different line-to-swivel connection, use that procedure instead.
The Estes manual mentions fishing-supply snap swivels but gives no universal component size or load rating for every rocket. A rating on a packet does not approve the entire recovery system. If your kit does not specify a suitable swivel or authorize the change, ask the manufacturer rather than choosing by appearance.
Check clearance before you pack the chute
Lay out the nose cone, cord and attached canopy in the arrangement shown by the kit. Confirm that the parachute has not replaced the cord connection that keeps the airframe and nose cone together. Sharing an eyelet does not make those two jobs interchangeable.
Next, follow the kit’s packing instructions with its specified heat protection. Check that the attachment bundle or swivel does not jam against the shoulder, snag at the tube opening or trap a line between the shoulder and tube. If the nose cone only seats when you force it, unpack the assembly and find the obstruction.
Do not solve a clearance problem by adding an improvised notch, cutting the shroud lines shorter or cramming the bundle deeper. Apogee’s I.T.S. video includes shoulder changes for that particular competition model; those details are not a general modification for other nose cones.
Our recovery-wadding placement guide covers heat protection separately. A dry fit can expose a snag, but it cannot prove successful ejection or canopy inflation in flight.
Fix the connection, not the symptom
| What you find | What to do before flight |
|---|---|
| One loop hangs outside the attachment | Undo the connection and gather every intended loop again. Do not tie the stray loop onto the finished bundle. |
| A line crosses the open canopy | Unpack and trace the line. Undo the attachment if needed to remove the crossing without cutting or retying it. |
| The snap will not close cleanly | Check for trapped thread and incompatible parts. Replace damaged hardware with the approved component; do not bend it into a new shape. |
| The eyelet is cracked or loose | Hold the rocket out of service until you complete a manufacturer-directed repair or replacement. |
| The connector jams at the shoulder | Recheck routing and the specified components. Seek kit-specific advice if correct packing still does not fit. |
Inspect before each flight and after recovery
Before packing, check the whole canopy, every line attachment and the gathered connection. Look for fraying, cuts, melted areas or a line that has pulled loose. Inspect the eyelet and any swivel closure too. Replace suspect parts rather than hiding damage inside a tighter knot.
After recovery, spread the chute before putting it away. A landing can leave a tangle or damage that you will miss if you immediately roll it back into the tube. Keep a note of any replaced component and recheck the manufacturer’s arrangement before the next flight.
If you are also changing canopies, use the replacement-parachute selection checklist before attaching the new one. A connection that fits does not establish suitable recovery performance. Finish by tracing every line once more, checking the closure if fitted, and confirming that the assembled recovery system matches your kit instructions.