How to fold a model rocket parachute without tangles
A parachute can fit inside a rocket and still be packed badly. A crossed shroud line, a tight wrap or a canopy pushed against the nose-cone shoulder can leave you with a bundle that has trouble coming apart. Learning how to fold a model rocket parachute starts with keeping the lines orderly, then making a package that fits without force.
For a small commercial kit, use its packing directions first. Estes describes a center-pinched canopy folded into sections; Apogee demonstrates folded-canopy methods with different line arrangements. They are alternatives, not steps to combine. The sequence below explains what each manufacturer says and where to stop if the fit looks wrong. It covers folding and inspection, not a promise that a particular fold will deploy on every flight.
Before folding, lay out the recovery system
Work on a clean surface with the rocket unpowered. Keep motors and starters out of the dry-fit exercise. Have the kit instructions, its specified parachute and the required recovery protection beside you. You should be able to inspect the whole canopy and follow the lines to their attachment without pulling against the rocket.
The canopy is the sheet or fabric that catches air. Shroud lines connect its edge to the recovery attachment. The shock cord joins the separated rocket parts. Keeping those jobs separate makes a tangled bundle easier to sort out.
- Open the canopy and check for tears, heat damage and loose line attachments. Replace damaged parts according to the manufacturer’s directions.
- Separate the lines gently. Follow each one from the canopy toward the attachment and remove visible crossings or twists before folding.
- Check that the canopy has not passed through a loop of lines. Folding over that mistake hides it rather than fixes it.
- Inspect the shock cord and its attachment. Our shock cord selection and inspection guide covers those checks separately.
Do not trim a line just because it looks shorter while the canopy is bunched up. Open it, compare the arrangement with the instructions and find the cause. Apogee’s demonstration checks matching line lengths with the canopy corners together; that observation is not a universal line-length specification.
The Estes center-pinch folding method
In the Estes Model Rocketry Technical Manual, the “Preparing for Flight” section on printed page 8 describes a simple spike-shaped fold. This is general guidance from the manual, not a replacement for the sheet supplied with your particular kit.
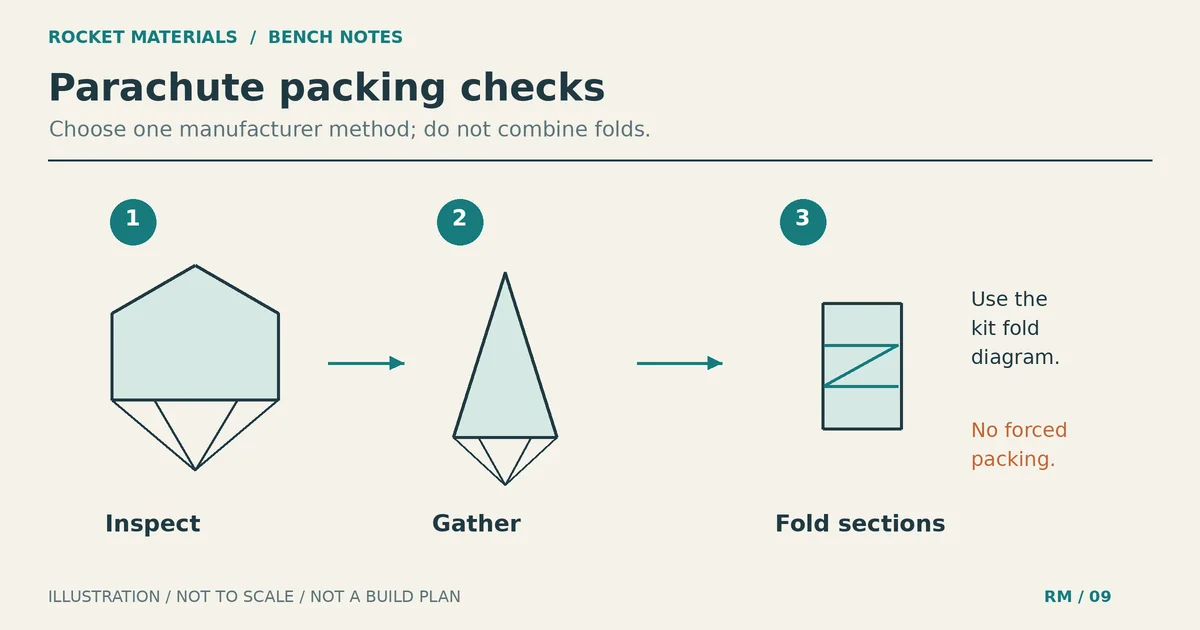
- Hold the canopy at its center between two fingers. Keep the shroud lines free below it rather than wound around your hand.
- Pass your other hand down the canopy to gather it into the narrow shape Estes calls a spike. Guide the material together; do not yank on the line attachment points.
- Fold that length into several sections. The manual refers to its accompanying drawing rather than specifying one fold count for every parachute. Use the kit diagram for the actual package shape.
- Install the specified recovery protection. In the manual’s arrangement, the shroud lines and shock cord go on top of the wadding.
- Place the folded canopy above the lines and shock cord, then fit the nose cone as the kit directs. Stop if you have to ram the bundle down or force the shoulder into place.
Notice what this sequence does not say: it does not tell you to bind the canopy tightly with its lines. If your kit shows a different line arrangement, follow that drawing instead of adding an external wrap from another tutorial.
Estes also maintains a parachute-folding help page that links to an Estes Education video and identifies 4:45 as the start of the folding portion. That is a useful visual reference when a flat instruction drawing is hard to interpret.
Apogee’s two variants change the line stow
Apogee’s Two Methods of Folding a Parachute demonstration begins by folding the canopy in half and bringing its corners together. Tim Van Milligan checks the lines before making the remaining folds. He explains that the choice affects how quickly the canopy can open and the load at the line attachments.
Those are the manufacturer’s stated trade-offs. The video does not establish a guaranteed opening time or a weight threshold you can apply to every rocket.
Lines folded inside the canopy
For the quicker-opening variant, Apogee gathers the corners, folds the canopy again and loops the shroud lines into the folded canopy. Another fold encloses the lines. The canopy then folds down, and the edges roll inward to make a small package.
Apogee explains that the lines can extend quickly from this arrangement, with more stress at the canopy corners. The demonstration presents it for small, lightweight rockets or a parachute suited to that loading. It is not permission to use a damaged canopy or ignore the kit’s prescribed packing.
Lines rolled around the folded bundle
For the slower-opening variant, Apogee describes a Z-fold for a long canopy: one portion bends back and the tip bends forward. The folded canopy rolls into a bundle. To take up the external shroud lines, the demonstrator rolls the canopy itself instead of winding the lines around a stationary bundle; he explains that this avoids putting a twist into the lines.
This method requires the outer lines to unwind before the canopy opens. Do not add tight wraps to delay opening further, and do not use external wrapping when your canopy manufacturer prohibits it. If your kit calls for the Estes arrangement, keep that arrangement rather than borrowing this last step.
A parabolic canopy may have different instructions
Rocketman’s parabolic parachute packing instructions explicitly warn against wrapping lines tightly around the canopy. For the products named on that page, the sequence straightens four lines, flattens the canopy and folds it in half. Both sides fold toward the middle, followed by another half-fold. The lines zigzag back and forth onto the canopy before the final fold.
That is a product-specific sequence, not a four-line rule for all parachutes. Its later deployment-bag and flame-shield options also belong to the specified recovery setup. Do not add those components to a small kit just because another manufacturer’s illustration includes them.
If you are identifying a replacement canopy, the plastic-film and nylon parachute comparison explains construction differences. The material name alone does not tell you which packing sequence to use.
Protect the canopy, then check the complete fit
A tidy fold does not protect a parachute from hot ejection gases. Estes calls for flame-resistant recovery wadding and specifically warns against ordinary tissue paper. Use the protection required by the kit, in its stated quantity and position. A built-in recovery system may have different requirements; do not assume it eliminates all additional protection.
The recovery wadding placement guide covers this part of preparation. Keep the packing loose enough to follow the manufacturer’s arrangement rather than compressing the protection into a hard obstruction. Do not substitute paper towels or household packing material.
Check the complete recovery package with the rocket unpowered. Include the specified protection and cord arrangement so you are checking the space they actually occupy, not just whether the bare canopy fits through the opening.
- Place the recovery components in the order shown in the kit instructions. Keep loose cord clear of the tube rim and nose-cone shoulder.
- Insert the canopy gently. If it binds, remove it and inspect the fold and line arrangement rather than pushing harder.
- Fit the nose cone by hand. Do not use it as a piston to crush the parachute into the tube.
- Remove the nose cone and carefully withdraw the recovery package without yanking on the attachments. Look for trapped lines or material caught at the rim.
This is a clearance inspection. Easy hand removal does not prove that the system will eject or inflate in flight. A package that catches or requires force needs attention before flight preparation continues.
Fix the packing problem you can see
If the bundle is too wide, unfold it and check whether the canopy edges piled up on one side. Re-form the manufacturer’s fold before deciding that a different parachute is needed. A neat fold can reduce wasted space, but it cannot make an incompatible canopy fit.
If the nose cone seats when the rocket is empty but stops short with recovery installed, inspect the occupied space below the shoulder. A cord across the rim or a bulky fold can cause the problem. Do not change the nose-cone fit to conceal an overfilled recovery compartment.
If lines twist again during packing, watch how you handle the canopy. Repeatedly rotating one part while holding the other still can undo your earlier inspection. Open the assembly and sort it again instead of burying the twist in a tighter fold.
If the canopy looks scorched or its line attachments are damaged, stop. A different folding method is not a repair. Replace the affected components and resolve the protection or assembly problem with the manufacturer’s guidance.
Check once more before closing the rocket
- The canopy and attachments show no unresolved damage.
- The lines are orderly, with no visible knots, twists or canopy trapped through a loop.
- The packing follows one applicable manufacturer sequence.
- The required recovery protection is in place, without a tightly compressed obstruction.
- The recovery package fits without force, and the shoulder does not trap a line.
Practice the fold with the unpowered rocket before launch day, using the instructions beside you. If the package still will not fit, ask the kit or canopy manufacturer about the intended recovery setup. Changing canopy size to solve packing changes the recovery design as well; that decision belongs in the separate parachute sizing and descent guide, not in an extra-tight fold.