Model rocket storage: protect fins, tubes and recovery
Model rocket storage should keep weight off delicate fins, protect the body tube from dents and moisture, and leave the recovery system accessible for inspection. A rocket that looks good on a shelf can still have a cracked fin joint or a parachute packed away while damp. Give each model a supported place to sit, then check it again before flying.
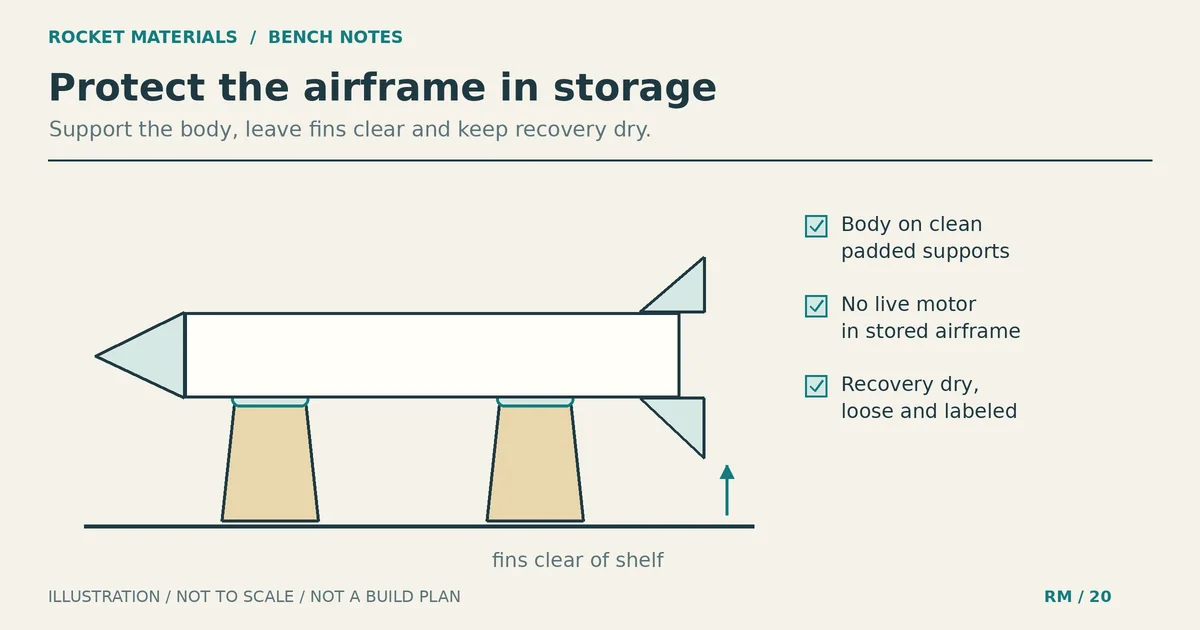
For ordinary kit-built models, a horizontal cradle or a compatible display stand is a sensible starting point. Store the airframe without a live motor installed. Commercial motors need their own manufacturer’s storage instructions; the advice for shelves and rocket boxes below does not replace those directions.
Put away a dry, inspected airframe
After a launch, let the model and spent motor cool before handling them as directed by the kit and motor instructions. Remove the spent motor when safe to do so. If a motor is stuck, do not wrench it out by gripping the fins. Set the model aside and ask the manufacturer about removal rather than crushing the mount or tearing a fin joint.
Open the recovery compartment and look for dampness, loose debris and damage. Remove accessible spent recovery wadding without digging at a glued-in anchor or baffle. Gently brush loose dirt from the exterior. Do not soak a paper airframe or pour cleaner down the tube.
Let damp parts dry separately in a protected indoor location before boxing them. Follow the component maker’s cleaning instructions if washing is needed. A tightly closed container is useful for keeping dust out of a dry model; it is a poor place to put one that has just landed in wet grass.
Record problems now. A tag saying “split tube lip, inspect before flight” is more useful than trying to remember which white rocket had the hard landing. Put damaged models in a separate repair area so they do not get mixed into the next launch batch.
Choose supports that carry the body, not the fins
The Estes Model Rocket Display Cradle, SKU 002293, is a manufacturer example of horizontal support intended for storage, display and transport. Estes describes it as holding the rocket on its side and keeping it off its fins. Check how the stand supports your model before choosing it. The listing does not establish a universal load capacity or fit for every airframe.
| Storage arrangement | Where the model rests | Check before leaving it |
|---|---|---|
| Horizontal cradle | Supported areas of body tube | Every fin and projecting detail clears the shelf |
| Compatible upright display stand | The interface specified by the stand maker | Stand fits without force and the base is stable |
| Individual compartment in a box | Body supports inside the compartment | Lid and neighboring models cannot press on fins |
| Loose pile on a shelf | Whatever touches first | Separate the models and add support instead |
Fit a horizontal cradle to the actual rocket
Place the supports beneath plain body sections, away from launch lugs, rail buttons, fin roots and fragile surface details. Use clean, nonabrasive contact surfaces. If you add padding, make sure it cannot catch a decal or transfer adhesive to the finish. Do not tape the rocket to the cradle.
While holding the model, rotate it to find an orientation with clearance under the fins. Place it gently in the supports, then check from the side and end. Look for a fin touching the shelf, a tube resting on a narrow hard edge, or a nose section pulling the model off balance. Move the supports or choose another cradle if you cannot get clean clearance.
There is no useful universal support spacing for every tube length, wall construction and finished mass. A long model needs an arrangement that supports it without leaving an unstable overhang. Do not hang it by the shock cord or nose-cone eyelet. Those attachments belong to the recovery system, not a storage rack.
Keep upright models within easy reach
Use a display stand made for the model’s mounting interface and follow its instructions. Never use a live motor as a stand insert. Do not force an oversized peg into a paper motor mount, and do not assume a small base will keep a tall model upright.
Put the stand on a level shelf where a passing sleeve, door or pet cannot knock it over. Leave enough room to lift the model out without threading its fins between neighboring rockets. A shelf that holds the whole fleet but makes removal awkward needs more space between models.
Protect tube ends, finishes and loose parts
For a storage box, give each rocket its own compartment or divider. The box should surround the model without using its fins as wedges. Close the lid slowly the first time and check that it clears the nose cone and the highest fin. Do not stack tools or another rocket on top of an airframe.
Keep loose replacement tubes straight and free of heavy objects. Protect open ends from being caught by a lid or pushed against a wall. Avoid pushing a tight improvised plug into a thin tube just to keep dust out; a clean cover over the storage compartment is simpler.
Choose a dry indoor location away from direct sunlight, heaters and places where leaks or condensation are likely. A painted paper tube still has exposed edges and openings worth inspecting. A fiberglass tube does not make the whole rocket immune to damage: it may still have wood fins, paper parts, coatings and recovery attachments. The cardboard and fiberglass body-tube comparison explains why the complete build matters.
If you separate removable body sections for storage, label them as a matched set and protect the mating ends. Put small removable hardware in a labeled container alongside the airframe. Do not disconnect glued or permanent recovery attachments just to make a model fit a shorter box.
Leave recovery parts loose enough to inspect
For storage between launch sessions, remove the canopy from its tight flight pack where the kit arrangement allows. Lay it loosely in a clean compartment or a roomy labeled bag after it is dry. Keep shroud lines with their own canopy, and avoid trapping them under a box lid or around the fins of another model.
Loose storage makes the canopy easier to inspect before repacking. Follow any storage directions supplied with your particular canopy; do not assume a fixed replacement interval. Plastic film and sewn fabric have different construction details; inspect the attachment tabs or stitching that your parachute actually has. The parachute construction comparison helps identify those differences.
Leave an attached shock cord relaxed rather than stretched around the airframe to hold the nose cone in place. Keep it away from sharp shelf edges. Before flying, inspect it along its accessible length and at the anchors. Use the shock cord mounting and inspection guide for component-specific checks, not a calendar-based replacement rule.
Commercial motor storage is a separate job
Follow the directions supplied with each commercial motor. Do not extend Estes guidance to another manufacturer’s composite motors or reload products, and do not infer motor storage limits from airframe materials.
In its engine storage guidance, Estes says its engines should be stored in a cool, dry place without exposure to excessive humidity or temperature cycling. It specifically warns that a car trunk through winter and summer can expose engines to cycling. Estes also says its engines do not have a shelf life, but ties expected performance to proper storage and condition. Check condition and storage history before deciding to use an older engine.
Estes identifies warning signs including a bulging or unwrapping casing and a crumbling nozzle or cap. If you find damage or do not know the storage history, set the motor aside and contact the manufacturer for advice. Do not repair, open or modify it. This storage guide does not provide disposal procedures.
The NAR Model Rocket Safety Code requires certified, commercially made model rocket motors and prohibits tampering or uses outside the manufacturer’s recommendations. Keep the engine identification and supplied instructions available so you can check the exact product before use.
Inspect again before the next launch
Bring the model to a clear work surface before packing for launch day. Storage is not evidence of flight readiness, even if nobody has touched the rocket since the last successful flight.
- Inspect tube ends and coupler areas for splits, dents, loose layers or a changed shape. Do not squeeze a tube to prove its strength.
- Look along each fin and its root joint for cracks or separation. A fin that moves at the joint needs assessment before flight. The fin alignment and inspection guide covers checking placement without treating alignment alone as proof of a sound joint.
- Check launch guides for damage or obstruction, and check accessible motor-mount and retention parts against the kit instructions.
- Open the canopy and inspect lines, attachments and the shock cord. Hold the model out of service if a canopy is torn, lines are detached, or an anchor is loose.
- Check nose-cone and removable-section fit without forcing them. Investigate a new tight spot rather than sanding away evidence of swelling or damage.
Repack the recovery system for the flight using the kit’s instructions and appropriate flame-resistant protection. Replace damaged components with kit-approved parts and resolve repair tags before returning the model to the launch box. Leave any rocket with uncertain structural or recovery damage at home until the problem has been assessed.
Once the inspection is complete, return the model to its own supports. Keeping that arrangement consistent makes a new dent, missing part or displaced fin easier to notice next time.